Shop With Confidence: FREE Growing & Glowing Promise

Free Shipping on Orders $199+

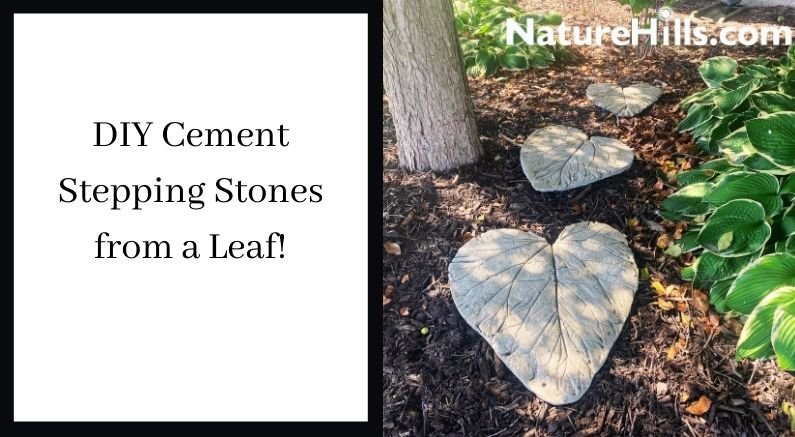
DIY Cement Stepping Stones from a Leaf!

DIY Cement Stepping Stones from a Leaf! - Nature Hills Nursery

Charlotte Weidner |

Preserving the beauty of the natural world and making a lasting keepsake from your own garden is easier than you think! Create magical outdoor decor that preserves nature’s beauty for years!

You’ve probably seen them made from Elephant Ears, Rhubarb leaf, and even Hosta, really any leaf that is the size you are looking to use, works great for your cement leaf stepping stones. Experiment with different leaf shapes and sizes, or use pre-shaped plastic stepping stone molds, or even old cake pans!

In this project, large Rhubarb leaves were used and Portland Cement, but any Type I or Type II cement that is fine-grained enough to pick up the impression of the leaf.

Tools needed:

  • Cement
  • 3-5 Gallon Bucket
  • Flat trowel (or spatula)
  • Water
  • Rags for clean up
  • Plastic sheets
  • Gloves, mask, apron, and old clothing/shoes
  • Cooking Spray or oil
  • Optional Chicken Wire or Mesh for extra support
  • Fresh Leaves
  • Wire brush or power-washer
  • Sandpaper
  • Cement sealer or outdoor paint

Step by Step:

cement on leaf

1. Lay plastic on your work surface to protect the area. It’s a good idea to have a rag ready for wiping spills before they dry.

2. Wear gloves, old clothing or an apron, and a mask since concrete/cement can have a lot of dust that you do not want to breathe.

3. Prepare the cement per instructions on the package, creating a thicker consistency that won’t run, yet thin enough to spread easily.

4. Prepare the leaf by spraying lightly with cooking oil. Preferably, the underside that features protruding veins. This will make removal easier later on. A 2-gallon bucket, half full of cement created one medium-sized leaf.

5. Working quickly, the cement begins to set fast depending on the type you’ve chosen. Working from the center, use the trowel to spread outwards, adding more cement as you go.

6. At this point, place your reinforcement mesh or chicken wire, then top with another layer of concrete mix.

cement all over leaf

7. Keep adding and gently spreading the concrete onto the leaf, gently pressing outwards towards the edges, ultimately accumulating about ½-1 inch thick. Be sure to keep it level and smooth.

8. Use the trowel to flatten the sides so they’re thick enough to not break when stepped on.

9. Lightly spray with water if the cement is setting up too quickly, allowing you to smooth out air bubbles or bumps, and smooth the edges.

10. Clean up! Wash everything before the cement sets.

Let set undisturbed in the sun for at least a day. Again, depending on the type of cement you are using, possibly less.

12. Once set and dry, flip the stepping stone once it is set, and expose the leaf to the sun and let it dry out before peeling. Remove what you can with the wire brush to whisk away the foliage and get into all the grooves. Or use your power washer to gently blast away the leaf bits.

brush leaf off dried cement

13. Use sandpaper to smooth the edges of the leaf if there are any sharp edges.

14. Once thoroughly dry, apply a Sealant, or paint it if you wish with outdoor paint first!

finished cement leaf

In just an hour of your time, you’ll have a lasting keepsake to grace your garden! DIY projects are a fantastic way to decorate and preserve nature’s beauty!

Highlight your DIY concrete stepping stones even by heading over to NatureHills.com and pick up some Creeping Thyme or other groundcovers to plant between your stones and some edging plants like Dianthus! You’ll have a polished pathway where plain ground once lay.

Previous Next

Frequently Asked Questions

What type of cement or concrete mix works best for making DIY leaf stepping stones?

For DIY leaf stepping stones, Portland Cement or any Type I or Type II cement works best, as long as it is fine-grained enough to capture the detailed vein impressions from the leaf. Avoid coarse concrete mixes, since the chunky aggregate will obscure the natural texture you are trying to preserve. Mix your cement to a thick but spreadable consistency, roughly filling a 2-gallon bucket halfway to create one medium-sized stepping stone. Start with a small test batch to dial in the right texture before committing to your full project.

How do you make a cement stepping stone using a real leaf as a mold?

To make a cement leaf stepping stone, start by laying plastic sheeting on your work surface, then lightly coat the underside of a large leaf such as rhubarb, hosta, or elephant ear with cooking spray to aid removal later. Mix Portland Cement or any fine-grained Type I or Type II cement to a thick but spreadable consistency, then use a trowel to spread it from the center outward, building up a layer of half an inch to one inch thick. For added durability, press a layer of chicken wire or mesh into the middle of the pour and cover with a second layer of cement, smoothing the edges so the stone is thick enough to support foot traffic. Let the stone cure undisturbed in the sun for at least 24 hours before carefully peeling away the leaf, then finish with a wire brush, sandpaper, and an outdoor cement sealer to protect it from the elements.

How do you get a detailed leaf imprint in a concrete stepping stone?

To get a detailed leaf imprint in a concrete stepping stone, choose a large leaf with prominent veins on the underside, such as Rhubarb, Elephant Ear, or Hosta, and lightly coat that side with cooking spray or oil before applying cement. Use a fine-grained Type I or Type II Portland Cement mixed to a thick but spreadable consistency, then work from the center outward, building up a layer about half an inch to one inch thick. If the cement begins setting too quickly, lightly mist it with water to keep it workable and help capture fine vein details. Press gently as you spread to ensure full contact with the leaf surface, and allow the stone to cure undisturbed in the sun for at least a full day before removing the leaf.

What kind of leaf makes the best imprint for DIY cement stepping stones?

Large, textured leaves with prominent veins make the best imprints for DIY cement stepping stones. Elephant Ears, Rhubarb, and Hosta are all excellent choices because their bold vein structure transfers beautifully into the cement surface. The underside of the leaf typically produces the clearest impression since the veins protrude more on that side. Choose a fresh leaf that matches the size stepping stone you want, lightly coat the underside with cooking spray before applying cement, and experiment with different shapes to create a varied, natural-looking garden path.

How long should you let a cement stepping stone dry before removing the leaf?

Allow your cement stepping stone to cure undisturbed in the sun for at least 24 hours before attempting to remove the leaf mold. Drying time can vary depending on the type of cement used, humidity levels, and temperature, so cooler or overcast conditions may require additional time. Once the stone feels fully hardened and no longer gives under light pressure, carefully peel away the leaf, then use a wire brush or power washer to remove any remaining leaf material from the surface.

How do you seal and protect a finished cement leaf stepping stone outdoors?

Once your cement leaf stepping stone has fully cured, apply a dedicated cement sealer or outdoor masonry paint to protect it from moisture, freeze-thaw cycles, and UV fading. Allow the stone to cure for at least 24 hours before sealing, though waiting 48 to 72 hours ensures the cement has hardened completely for best adhesion. Lightly sand any rough edges with sandpaper before applying the sealer, and use a wire brush or power washer to remove any debris if the stone has been outdoors. Reapply sealer every one to two years to keep your stepping stone looking its best and protected through all seasons.

Can you add color or texture to a DIY cement leaf stepping stone?

Yes, you can absolutely customize your cement leaf stepping stones with both color and texture. Add powdered or liquid concrete pigment directly to your cement mix before spreading, or apply concrete stain or outdoor paint after the stone has fully cured. The natural veining and texture of the leaf itself provides beautiful built-in detail, and using the underside of large-leafed plants like Rhubarb, Hosta, or Elephant Ears will give you the most pronounced impression. Once your stone has cured for at least 24 hours, finish it with a concrete sealer to protect both the color and the surface texture for years to come.

How do you place and level cement stepping stones in a garden path?

To place cement stepping stones in a garden path, dig out each spot about 2 to 3 inches deep so the stone sits slightly above grade for good drainage and visibility. Add a base layer of sand or gravel to allow for leveling adjustments, then set the stone and check it with a level before filling in the edges with soil or mulch. Space stones roughly 18 to 24 inches apart, measured from center to center, to match a natural walking stride. Press the stones firmly into place and walk on them to test stability before considering the project complete.

How do you keep a cement stepping stone from cracking after it cures?

To prevent cracking, seal your finished cement stepping stone with a quality cement sealer or outdoor paint once it has fully cured, which typically takes at least 24 hours but may require longer depending on your cement type. Adding chicken wire or reinforcement mesh midway through the pouring process, as described in the steps above, gives the stone internal support that significantly reduces the risk of cracking under foot traffic. Place your stepping stones on a level, stable surface to avoid uneven pressure points, and reapply sealer every season or two to protect against freeze-thaw cycles in colder climates.

Can you use the same leaf mold technique to make other cement garden decorations?

Yes, the leaf mold technique works beautifully beyond stepping stones, and you can use it to create birdbaths, decorative platters, garden markers, and shallow bowls by simply adjusting the amount of cement and the surface you work on. Large-leaved plants like Elephant Ears, Hosta, and Rhubarb are ideal because their prominent veining creates stunning texture and detail in the finished piece. For smaller decorative pieces, old cake pans or pre-shaped plastic molds can substitute for or complement natural leaves. Experiment with layering different leaf sizes and shapes together, and finish any piece with a cement sealer or outdoor paint to protect it from the elements and extend its life in the garden.